Wednesday, September 29, 2010

Battle wear, Battle worn


     Since my last update, I've plodded along with my veterans squad. The progress is slow, but satisfying so I don't see my pace changing too much. I've only got one more model  left to paint to complete the squad, so I'm looking forward to meeting that milestone very soon. Most likely I'll finish him today.

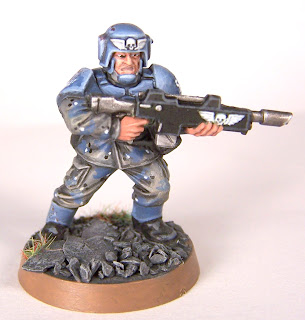
     I want to talk about that model at the top for a moment. While I've continued to work on my smoothed highlighting style, I've also been working on the wear-and-tear effects I've been employing. First off, I save them until the very end of the painting process. I basically want the chips and dings to be the last step. It gives me time to feel out the model while I'm painting it, and come up with some ideas of how I want to express the damage to that particular character's armor. The second step is making my dark scratch, chip, or ding marks. I used either a sponge dabbed in a mixture of Scorched Brown and Chaos Black (about a 60/40 mix), dab off excess and then press a small portion of the sponge to a chosen spot on the model. I use the same technique with Shadow Grey and dab that over the white decals to make them look a bit chipped as well. Alternatively I'll use a very fine brush and free-hand some scratches or circular "dings."

     With that done, the most important part of the process is to properly highlight these marks. You really do most of the work during this part. Your goal should be to express a depth or the severity of the damage through the use of shallow or deep highlights. What does that mean? Well shallow means less highlighting, but possibly sharper, narrow highlights. Deep damages have larger "halos" of highlighting.  Don't be afraid to exaggerate it.

     I had been using the GW 'Eavy Metal technique of using a little silver metallic inside of these marks, but it seems to take away from the marks and lessens their visual impact. If I was using a darker blue (or should I say "deeper" blue... whatever) the silver flecks would show up a bit better. As it stands, the contrast of the lighter blues with the darker scratches looks pretty solid.

     I am a real cheap skate when it comes to this hobby, so I'm always making an effort to get as much as I can out of my hobby dollar. To that end, I am repainting my original test models of my Guard army. I've completed my first repaint, and here are the results:


     I think we can all agree that it's a pretty nice change. Granted it probably takes me twice as long (at LEAST) to paint the newer version. The added benefit of repainting my first two test models, as well as completing the other three from that little 5 man Cadian box, is that I'll have some extra models to use for whatever converting purposes I can conceive.

     So Dark Eldar... AWESOME! Those are some great looking models. I'm really looking forward to seeing some of the rules and ideas they have for the army. Seems to me that 40K has been in desperate need of "cool" bad guys. The Chaos stuff is just a little too "try-hard" for my tastes. Too many spikes and exaggerated "evil" looking stuff that ends up looking like an 80's metal album cover. To many, that's a good thing, and hey buddy, that's fine. But this new look for Dark Eldar is just slick. While maintaining a very organic look to tie them in with Eldar, they've given them an edge that really just pops. Sure there are models with horns, and in limited quantities, that's fine. This release comes at a good time, as I've been looking over the Killzone: Spec Ops rules. This has inspired me, once again, to look at those low points, skirmish type game. I don't know if I'd want an entire Dark Eldar army just yet, but I'd LOVE to paint some of those models. If I can find any excuse to play them on a table, game on!

     I'll wrap this up now with a few pics of my completed models:


Hope you enjoyed! Comments, tips, or critiques are appreciated!

Thursday, September 16, 2010

Radio Free Empire


     Vox caster = Done! First, I have to say that this has always been a model that I thought to be goofy looking. I don't think it was until I was early in painting this that I started to like it. I mean, it has a really good 41st millennium look about it. I really had fun with some of the details, and it made a nice change from the standard Guard las-rifle models. That in mind, I do have quite a few more of those to go, so chin up! I had find making this base, and it was the first time I used any brass etching. I think the panel came out nice, but it doesn't photo well. The metallics and rust scheme doesn't come through the camera well at all.

     I was pleased to receive a gift from a good friend today. Two Leman Russ tanks! Both the Battle Tank and the Demolisher. Wow! I was really taken aback. Thanks man! What a friend to have! I also was up at the local GW store today, and decided to go ahead and pick up the Command Squad box. What a cool box! This type of thing makes me not feel so bad when I pay that much for little plastic men. I'm going to have a lot of fun using all the little bits in there. There's even a Servo Skull, which I have NO idea how to use that. Hmm... objective marker anyone? We'll have to see.

     Here's a few more pics of the Vox Caster, and one of my squad as of now. Enjoy!


Tuesday, September 14, 2010

Just follow Sarge!


     Yet another Imperial Guard update. I'm very excited as things are actually moving forward. My camo paint scheme seems to have established itself on the models well enough that I'm no longer second guessing my finished results. I've managed to add the sarge, and a melta gunner to my previous two models. I'm going painfully slow on these, I know, but the results are rewarding, and I'm happy enough to just slowly plug away like this.

     I was listening to a 40K related podcast this afternoon (came highly recommended from a friend) called "The Independent Characters" and their latest edition deals with 40K campaigns. Just the mention of campaigns starts my imagination racing. The main reason I enjoy 40K as much as I do is the fiction. The back story to the universe is just super slick to me. I haven't yet had the pleasure of playing in a campaign, and I know I have some friends back home in Texas that feel the same. Sadly, geographically speaking, it's impossible to carry out these wishes. I'm hoping that the next few years separated from my homeland will give me amble time to come up with some cracking good ideas for a started campaign, and hopefully enough time for my friends back home to hammer out some armies and strategies. Perhaps I might find some time to find some local campaigns to get my feet wet in the meantime. We'll have to see.

     Something that I might not have mentioned, but I certainly want to share with everyone that might read my blog: Decals and Microsol!

     First decals. I've avoided decals up until now. I've had a fear of them ever since, as a young impressionable child, I messed up a perfectly good Ferrari model car with some horribly applied decals. I've never forgiven myself. Coming into 40K about a year ago, the fear re-emerged as strong as ever. I've only now just started to use them on these Guard models. I quickly discovered the drawbacks:

- "Halo" effect around the decals makes it look obviously not part of the model
- Lumpy decals across curved surfaces
- Glossy surface obviously sticks out against the matte effect of model paints

     I was determined to fight those ill effects. The "halo" and glossy problem can be fixed in the same way. All you simply need to do is paint over as much of the decal as needed to hide those effects. The lumpy decals on curved surfaces seemed a harder problem to solve. Fortunately I remember hearing about Microsol, which is a nifty product that, when applied to a decal, manages to make them lay flat against most surfaces.

     I've been using on my models and it really works great. If you decide to pick some up, here are some good tips on using it:

- Apply only as much as to cover the surface of the decal. Too much and it starts to mess with the paint.
- Be patient and apply multiple coats for those larger decals that are a bit more stubborn against laying flat.
- Microsol seems to work even after it is apparently dry, so just wait before applying those follow-up coats.

     I feel silly for not having used decals before, now that I know how easy they can be applied and how much they can add to a model if done right. Don't be afraid to paint on the decals to show wear and tear. You can even use washes over them. Experiment and have fun. You should have plenty of decals from the various sheets you get to test out a few ideas. I recommend lightly dabbing a tiny bit of sponge in some paint and then dabbing that on top of the decal. It creates a quick and natural scratched or chipped look.

     Here are some more pics of the sarge and the melta gunner. Hope you enjoy:


Saturday, September 11, 2010

Does black make my butt look big?


     Thanks to a reader, I gave a black weapon a try. It looks significantly better. Good call! I've completed the above model and fixed the previous model with a black weapon as well. Looking good! I'm ready to move on to painting some more of my first squad. I'm going to have a squad leader and a melta gun guy as well. Here's a few more pics:

Thursday, September 9, 2010

Guard confusion


     Guh! I've been working on my paint scheme for my next army. I'm going with this urban camo type look. I've painted the above three minis as tests for some ideas. They are arranged, from left to right, earliest to latest. The first model, I didn't use any washes on. I was trying pure paint layering. The cloth looks okay, nice and worn-in, which I like. The armor is a tad too light and seems to not contrast with the cloth enough. The middle one was a quick paint. I didn't layer as many colors and I went darker on the cloth color. I also used a wash on the armor, clot and weapon. While that certainly made the overall paint scheme darker, I now have dark cloth AND dark armor. So contrast... fail. I was determined to stick with my overall idea for my army. I did some more research, came up with a good tutorial on GW's site about painting camo on IG troops. I thought I'd give it a go. The results were very good. I liked the look, and I think I pulled it off well enough. I was still waffling though, and I didn't know what to do. I decided that I'd take my three test subjects with me up to my closest GW store, and see if I could get an opinion or some advice, as I needed to pick up some paints anyways.

     I was helped by a red shirt that just so happens to be a fantastic painter. I've seen his 40K Orks, and they look great. He mulled over my figs for a while and came to the same above conclusions that I had. That didn't help. BUT he started looking at the camo one, and declared that he knew how to make it work. He proceeded to paint on my mini (didn't ask me... which was kinda shocking, but he knew what he was doing so I let it slide) and the results were pretty good. Basically he brightened the armor, highlighting it in a bit more extreme method (rather than just hard-edge higlighting) and it looked kinda slick. He just did the back of the chest armor. I decided I'd go home and do the rest of the model and see what I thought. Here are the results (before and after style):


     It looks better. I've finally found some contrast that makes this scheme work. Now I just need to paint 24 more. If you have any opinions or questions, let me know. I've started plugging away at some more models, so I'll update you on that as I go. Until next time...

Friday, September 3, 2010

New Guard, and new setup


     This is my first test model for my Guard army. I'm going for that urban look. I've got a few more tests to go, but so far I like these colors. I just need to make sure it's not too monochromatic. I'll be tweaking it as I get through my first three or so models. I've also re-established my painting table in my new place. I'm happy with the new layout:


     Any thoughts out there on my Guard scheme?

Games Day Photos


     Here, at long last, are some photos of Games Day 2010 in Baltimore. I lost my camera's cable somewhere during my move, and I finally had to break down and just buy one at Best Buy. 28 dollars later, PHOTOS! So I took lots of photos and I'm not going to show them all here. If you want to see all of the shots, check out my gallery here.

     The first thing I took a bunch of photos of were the GW display tables. These were pretty impressive, but some difficult to get good photos of. I really enjoyed one Warhammer Fantasy table in particular that showed an awesome castle being sieged by a Skaven horde. The really interesting part of this display was the tunnels that were carved out under the castle, showing Skaven sappers trying to dig their way into the city:


     I had to stop by the Forge World displays and check to see if there was anything I hadn't seen announced yet. I was pleasantly surprised with the Red Scorpion Librarian and Honor Guard. The Tau crisis suits, though not "new", are just SO much more impressive in person, though I didn't bother getting photos of them as they were in a horrible position for that.


          I swung by the club tables to see what was going on. I recognized Jawaballs' banner over at one of the tables, and spotted him hanging out by their table. I'm no fan of Jawaballs, so I just kept on walking. I found my favorite banner of the day nearby:


     They were also running one of the coolest tables there as well:


     After checking out those club tables, a strolled by the booth promoting Relic's Space Marine game (looks totally awesome) and they had an animatronic costume of an Ork Boy. Very impressive bit of kit. The kids seemed to really like it, and those that didn't were too terrified to say otherwise.


     I now found myself at the open tables area. There were some excellent tables setup, and some interesting terrain to play with. I strolled about for a while, watching people setup, and start some games of 40K and Fantasy. I finally found someone to play a game with, as I described in the last post, and here are some pics of that battle:


     I ended my day by taking a tour through the Golden Demon gallery. There were simply tons of awesome paint jobs and models. So much to see and take in. I was really taken with a Plague Bell that had been modified with a nice little LED inside the ringer, and a really awesome Ork Deffdread (I think) that looked just totally wild. I took a bunch of pics of the models on display, so check out the gallery for some more Golden Demon entries.


     If you have any questions about these pics, or the ones you see in the gallery, feel free to post those questions in the comments. Oh and one more for a friend back in Pensacola...

Banshees are better....