Saturday, April 26, 2014

Adepta Sororitas (Sisters of Battle) Army Commission Project WIP (Part 2)


First Completed Squad

     Five down and 36 more to go.  GUH!  I shouldn't say it like that.  How about one squad down and seven more to go?  That's slightly better.  This squad took me about a week to complete from primed to finished.  I can only paint after 8:00 pm and I didn't paint every single night during that week.  I think that I can refine my process and get another five models done in perhaps 4 or 5 days (and that's allowing for some nights were I don't paint).


Thoughts About the Models

     I'm becoming more familiar with these models now.  I want to remind people just how old these sculpts are.  Some of these models are on the near side of almost 20 years old.  That's INSANE!  Unfortunately they show their age in a number of ways.  Obviously the first tell-tale sign is that they're metal.  I've been over that before so I'll move on.  The next big indicator is the faces.  The faces are a bit crude.  They aren't ugly, but there is a HUGE difference in the finer detail that can be achieved via plastic or resin crafted through modern sculpting techniques.  And finally there are just some bad looks that had to be made given the technology of the day.

     When these models are sitting at normal gaming distance, none of these faults really matter.  They still look like a part of the 40K aesthetic.  The only thing that might strike you at that distance is that there appears to be quite a large number of repeat poses.


Thursday, April 24, 2014

First Completed Scion


Astra Militarum Tempestus Scion Showcase

     I've completed my first Tempestus Sci... BAH nevermind that silly name... STORM TROOPER! HAH! Yes I've completed my first Storm Trooper from the new kit.  I'm not planning on cranking this squad out just now, as I've got bigger fish to fry.  I really wanted to completely assemble and paint one of these new models, however, so I could learn a bit more and give you guys a more detailed review of the model.


Assembly

     This kit, more than any other infantry kit from Games Workshop, demands that you follow the instructions.  On my previous post concerning this kit, I mentioned the instruction booklet (which it actually is, not a single sheet but an actual little booklet) and how impressed I was with it.  After completing the first model, I now know that the amount of detail they put in there was absolutely required.  The power cords coming off most of the weapons require that you match them to certain arms and backpacks.  Test fitting your model before you start gluing is mandatory too.  The backpack's power cord needs to meet up with the weapon's power cord and that determines the angle of the arms.  I would recommend plastic glue for assembly over super glue.  As long as you check and double check the fit of everything prior to gluing, you'll be fine.


Painting

     Games Workshop released a two part video tutorial on their YouTube channel (you can find part one here).  I want to first point out that this recent trend of them releasing these tutorials to coincide with their recent releases is actually really smart.  The videos are easy to follow, and well produced.  Even a 6 year veteran to the hobby can still learn some things from these.  I decided to follow their basic path to completion, but I altered colors to match with my existing guard.

Here are my other Imperial Guard Infantry... sorry... Astra Militarum *sigh*

     I tend to fully assemble infantry models before painting as I figure that if it's difficult to get my brush there in order to paint something, it's generally difficult to see that area.  That said, if I were looking to paint this figure up to a competition standard, I would have left the weapon off to better paint the chest armor.  There are some very fiddly details on these models so I also recommend just base coating pretty much everything first, then coming back to clean up prior to applying washes.  This should be pretty standard practice, but with all these fine details (like the metal trimming all over the armor) you want to make sure your base coats are nice and clean, carefully going over all the edges where two colors meet.

     One thing that stood out as I neared the end of painting on this model: no decals.  I wasn't a fan of transfers when I started in the hobby, but after becoming more familiar with all the tips and tricks in applying them, making them blend into the model, and weathering them, I've come to quite enjoy them.  My guard veteran squads all have transfers, each with a meaning as to the organization of my particular regiment.  I like these little visual story bits.  The new Storm Trooper kit does not have a transfer sheet at all, which isn't a surprise because there isn't any actual real estate on which you could apply them.  I decided that I would copy the GW style of paint job on their box-art Temestus Scions and have an arm stripe, but instead of a brighter shade of blue, I would incorporate white, as that can be seen as a common color across my existing guard.  This decision turned out to be a wise one.  Once I added this stripe, the figure seemed to be complete.  If you are planning on following your own custom theme for your Scions, and perhaps you were on the fence about the arm stripe, I am here to say that it's a good idea.  Here are some pictures followed by a few last words.  Enjoy:


Conclusion

     I like these models, but I actually like them a slight bit less than I did on first impression.  These models are perhaps too detailed.  With hardly any larger open surface areas, I found it difficult to express the same amount of freehand blending and weathering.  Weathering seemed to busy up the model a bit too much given the existing level of physical detail.  I'm going to try more edge weathering on subsequent Scion models.  I still like the models, just not quite as head-over-heels as I was when I saw those first leaked pictures.

Base

     The base used for this model can be purchased from the fine folks over at Secret Weapons Miniatures.  This is from their "Urban Streets" bevel edged resin bases line found here.  I like the fine detail that Secret Weapons Miniatures has on their bases, but I have a few points of contention with this set.  The first complaint is that they are a bit "tall" which resulted in this Storm Trooper being about a head taller than my other guard on standard bases. The second complaint is that the beveled edge was rather rough and required a good bit of clean-up.  Both of these complaints certainly aren't deal-breakers, and I will most certainly continue to use them for my Tempestus Scion squads.

Tuesday, April 8, 2014

Adepta Sororitas (Sisters of Battle) Army Commission Project WIP (Part 1)


Sisters of Battle Project is Go

     A few years back, a good friend of mine asked if I would be available for a commissioned army.  He had long been a fan of the Adepta Sororitas (a.k.a. The Sisters of Battle) and had desired to have an army.  A few road blocks presented themselves for him when deciding on this army:


  1. The Codex - At the time they were encapsulated in the "Witch Hunters" codex, which was generally pretty poor performing in Warhammer 40K 5th Edition (which was the new edition on the scene when he and I entered the hobby).  It was badly in need of an update, but no credible rumor foretold of an imminent refresh.
  2. The Price/Kits - The sets up models that you could purchase from GW were expensive.  Generally they were lacking in the specific weapon choices that my friend wanted to run.  This meant that he would have to spend even more to pick up additional models with the proper weapons, and he'd have a pile of models holding weapons he wasn't even interested in running.
  3. The Metal - In addition to these model kits including or excluding options he didn't/did want, they were ALL metal.  Even after Finecast came on the scene, these models remained metal.  Now metal as a medium for delivering a detailed miniature is just fine, but working with metal for extensive conversions or giving you choices for assembly, metal is terrible.  Compare these metal models to one of the modern plastic squad kits and you'll see the obvious short comings.  Among the units he wanted to field there would be a huge number of repeated models.  And if you had a specific look that you wanted, like helmeted heads, forget it.  You got what you got.
     The arrival of their new (digital only) codex brought them a refresh, but not much of one.  They changed the faith powers (making them a bit more "meh") and tweaked around here and there, but that was it.  No new units, no new amazing special rules, and certainly no new models.


So many blister packs!

The Beginnings

     He decided that his dreams of new kits, amazing new codex, and modular plastics as far as the eye could see were a bit of a pipe dream.  Given that the only constant with Games Workshop is "price increases" he would be better off just buying them now before they went the way of the Squats.  He showed up at my house with some very hefty boxes stuffed full of metal infantry and piles of vehicles.  The journey began.  We spent most of a day just filing, clipping and cleaning up the infantry.  If you've never worked with metal, you might not be familiar with the process.  Just like plastic models, mold lines are an issue, but unlike plastic, metal models can have all sorts of "nibblets" poking out (and 'poking' is the right word as these things can be sharp and generally pointed directly outward from the model at your beckoning flesh) as well as some pretty beefy "gates" where the metal has the be clipped and filed in huge chunks.  In addition to all that, pinning is generally a must for a quality long-living model.  If you drop a metal mini that hasn't been properly pinned, expect an explosion of parts.

Heavy Metal!

     I also wanted to be sure to pin all models to their bases, again assuring that they'd weather the wear of time far better.  Pinning mean drilling.  Drilling and filing combine to make some unhappy metal dust that I would recommend avoiding if at all possible.  I might have shortened my life span working on these models.  The work must go on!

Testing the Paint Scheme

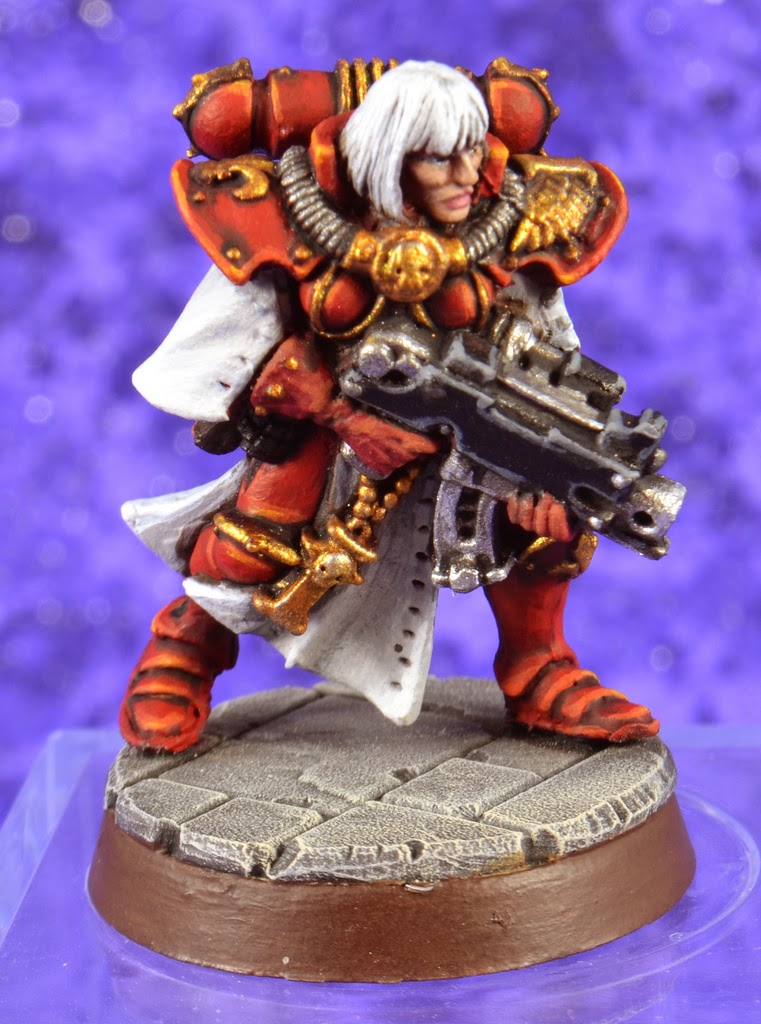
     Long before we began the assembly, my friend had carefully thought out his desired paint scheme.  He wanted something unique that would stand out, and colors that he obviously just liked in general.  He ran these thoughts by me.  This is great because I could work with him to figure out what would work best in color theory, and advise about techniques I had tried so I knew what would work and what wouldn't.  He sent me along a reference picture and I grabbed his one extra Bolter Sister and conducted a test run.  Here are the results:


     This first test was painted slightly rough for speed.  No matte coat was applied so some parts of the model are overly glossy, but I wanted to get some idea of how the color scheme would look, and how the model was to paint.  Learning your way around a model is very important.  I have, at times, sat at my painting desk for a good 30 minutes just looking over a model prior to painting just to understand where things were, and what order I wanted to paint things in.

     This first test was pretty good, but it just didn't feel right to me.  My big concern was the reds.  While they looked red, they really didn't pop.  Looking at it now, it seems like the red is very "realistic" which sounds great but this is 40K we're talking about.  Realism is for historics and people making military dioramas.  I wanted to have another pass:


     This pass was much more along the lines of what I thought this bad ass Space Nun should look like.  I used Citadel Mephiston Red base (or 'foundation') paint.  I just painted directly over my previous Reaper Violet Red.  I then used an orange edge highlight with a yellow final highlight.  This really made the model stand out at normal gaming distance, but still looked great close in.  My friend was pleased with this version and now I'm ready to move along.


In grey primer, they almost look plastic!  If only...

Primed and Waiting

     I went ahead and primed all 41 of the infantry models.  I'll be working on them in batches of five.  A five model batch, I feel, is the right volume in order to do some very detailed painting, while still affording you some assembly-line benefits.  The only down-side to five versus ten is that you might still have some waiting to do when applying washes or other slow-drying techniques.  I save the larger batches for things like Ork Boyz.  It also works out that his squad sizes are nearly all five models, so I decided to just do these as squads which also allows me some (limited) variety in the models that I'm painting.  It's good to mix models up just a little bit within the parameters of assembly lining things to give you a little mental relief.


Stacks on stacks on stacks of vehicles.

Get on the Bus

     These lovely ladies need a ride, so my friend purchased seven Immolators in addition to three Exorcists (to provide some vehicle/elite sniping support).  I think that I can now assemble a Rhino chassis in pretty short order.  I would like to take a moment and tip my hat to the Sisters' vehicle kits, because these are amazing.  For the price of a Rhino, the Immolator offers a HUGE amount of decorative elements that are either Sister specific or just Gothic and grim-dark as all get out.  The Exorcist is no exception.  If you can look past the fact that the quarter and front panels are all metal, along with the massive amount of metal on top of the vehicle, there is some stunning detail here.  I think I would describe it as "lavish" and that's no stretch.  The pipe organ is apparently not to everyone's taste, but I can't think of anything more Gothic than a freaking pipe organ on a missile launcher.  The Forge World alternative is boring, dull and boring.  I said 'boring' twice because it's doubly boring.

DERP!

"Uhhh... Nottingham... We have a problem."

     All is not sunshine and hugs in the land of Sisters' vehicles, however.  There is an error in the instructions.  I've pointed to the error in the above photo.  There are four lengths of tread per side of a Rhino chassis.  A single tread, a double tread, a triple tread, and the enormous long tread length for the bottom.  The instructions show a triple tread piece being used on the rear of the vehicle, on the top of the tread curve.  This is wrong, however, and you should use a double tread piece.  This error would have been easily caught if I was just assembling one Rhino chassis, but when you're batch assembling 10 vehicles, and you've just clipped out all the basic chassis pieces and put them into one box, you might just be dumb enough to follow the instructions.  Thankfully, after contacting Games Workshop's customer service, they have sent out addition double triple tread pieces so I can complete the remaining three chassis.  

     Maybe this bit of text stops someone from making the same mistake in the future, but I doubt it will come up all that often.  How many people do you know are out there assembling 10 Sisters of Battle vehicles?  That's pretty much what I thought.


More to Come

     There will be more updates to come as I complete some painting.  If you have any questions about these models, or if you're interested in the army list that my friend is planning on running, please feel free to comment or email.  You can also see some more pictures of the test model in my Flikr feed off to the right.  Enjoy and thanks for reading!

Thursday, March 20, 2014

Ork Blitza-Bommer All Done


Here's the Finished Product!

     I completed the base this evening.  Unless I decide to add some flocking or grass tufts (which I'm likely to do).  The painting, at the very least, is totally complete.  I kept the base simple, but focused on some weathered accents in the abandoned oil drum, and rusted bucket.  I really enjoyed mucking up these two items, especially the barrel.

I Love Rust and Such

     I used some very simple techniques and the outcome was terrific.  Here's a quick step-by-step:

  1.  I based coated the barrel with the old Knarloc Green which is now called Loren Forest (Citadel paint).  
  2. Then applied the transfers like this: a gloss coat, put down the two transfers, applied micro-sol, let it dry, then applied matte coat to seal the transfers in.
  3. Once the matte coat was dry, I took a sponge and some Knarloc Green (Loren Forest), and dabbed it over the transfers to "rough them up" a bit.
  4. Applied a wash of Agrax Earthshade across the whole barrel.  I made sure to reapply to recesses that would have a larger collection of dirt, rust, and oil.
  5. I then used the new technical paint Typhus Corrosion.  I applied it very heavily to the bottom of the barrel, and along the underside to show that it might have been slapped around in the mud just a bit when it was hurriedly left by the Imperials.  Typhus Corrosion leaves a grit, which would be vital to the next step.
  6. I dabbed Vallejo Pigment (or weathering powder) Dark Red Ochre (sic) around the bottom of the barrel were the Typhon Corrosion was thickest.  Once applied fully, I took a clean brush loaded with white mineral spirits and carefully tapped over the powder.  The mineral spirits really flow of the brush and quickly run across the model.  I do this to "pull" the pigments onto the model.
  7. Once the mineral spirits have dried (this is a pretty quick process) I now very carefully dabbed matte finish over the rusted areas, and then eventually brushed over the entire barrel.


Oil Spill

     Another really easy effect is the look of some leaked oil onto the mud.  It's a bit hard to see in the picture, but shows up well in person, but essentially all I did was apply a pool of black wash to the earth near the lid.  Once dried I then coated the same area with a gloss coat.  This looks like oil soaking into the ground, but still a little fresh.


Secret Weapons Miniatures Base Review

     This base from Secret Weapons Miniatures is quite nice.  Though it doesn't scream out with detailed features, it fits perfectly with the rest of the army.  I pictured my Orks on a dreary wasteland, harsh and unforgiving, but with plenty of space to speed about.  I liked the subtle tire tracks through the dirt, and the very simple rocks.  The most important feature for me was that there would still be space for me to attach my flight stand and most all of the Secret Weapons line of bases seem to be very reasonable in the amount of room you have to actually mount a model.  I have a number of other bases that I've purchased from them and all bases arrived nearly completely flash free and with a low amount of mold release on them.  This means they are quickly cleaned up and ready for models.  My one possible complaint would be that the edges sometimes need a bit of filing to get absolutely smooth.  This is really a very minor complaint and honestly if you're in this hobby you're probably more than willing to spend a few minutes filing or sanding to make sure everything is just so.

     A quick word on how I put the flight stand and base together: In order to attach the stand, I traced out the stand before I painted, and carefully carved out a very shallow smooth footprint for it to make solid contact with the base.  I then pinned it in as a final measure.  I'm still going to be awfully careful with this flight stand, as it certainly isn't the most aggressive way to attach it to a base.


Thanks for Stopping By!

     I appreciate everyone that comes by to view my work.  Any feedback is appreciated and I'll be happy to answer any questions.  I'll just leave you with some more pictures of my completed project, enjoy!


Wednesday, March 12, 2014

Boom Bombs go BOOM!

Boom Bombs

     Before you are the two "Boom Bombs" for the Blitza-Bommer that I've been working on.  I didn't spend a heap load of time on them since they're both mostly concealed by the actual flyer.  Magnets were added so that I can remove them during play as the bombs are obviously one use only.   I did take it as an opportunity to try out a few techniques while painting these:


  • Steel Wool to dab on paint to make scratches - This seemed simple enough but steel wool outside of using it wet to get rust and hard grime off of things is a real mess.  The steel wool is loaded with flakes of a dried cleaning agent.  I had to spend some time trying to shake all these bits out of the wool because I had no idea what this agent would do to the paint.  If you can find steel wool without this additive, choose that.  The effect I was hoping to get was a less grouped chipping pattern than the sponge.  I was a little disappointed, to be honest.  Perhaps I just need a bit more practice.  In the end I went back to the tried and true sponge.
  • Bit more complex checkers and jaggies - I followed my simple technique of using a fine pencil to very lightly trace out my checkers but I also used a design template that I had laying about.  This template has circular holes of varied sizes, so I placed the nose of the bomb in the circles to make the sketch marks that went around the nose.  This was fairly successful but needed a bit of adjustment.  I then did one reference circle on the white and orange bomb nose, and used the rivets around the nose cone to space my jaggies.  Pretty simple really.
  • Typhus Corrosion GW Technical Paint - I recently picked up a pot of Typhus Corrosion and Blood for the Blood God and I was itching to try the Corrosion out.  The effect is fairly subtle here only because I noticed how strong it can be.  Though it resembles a wash to a degree, it is much more opaque.  Fair warning there.  I found that if I applied it, then quickly washed my brush and went back with just a little water on the brush, I was able to smear the paint to blend the effect and this allowed for a bit more translucent look.  I really enjoyed the paint but with great paint comes great responsibility.  Test before slathering it all over your Rhinos or what have you.
  • Striped cables - I painted the cables on the bombs yellow and black striped.  I've seen this style done quite often so I wanted to see how much of a pain it might be.  I based with a light orange, then layered on some yellow.  Once this had dried, I just took straight black and eye-balled it from there.  I was careful to try and make the stripes look even.  Working around a thin element like a wire on a model can get you into a bit of trouble if you start getting sloppy with the brush control.  That said, I found this look to be easy to achieve with moderate accuracy.  Might have to use this on some future Ork models.
     Other than that, this was a pretty straight forward bit of fun.  One thing I would like to add: never under-estimate the blending effect that a full matte coat can provide.  When I was done with all the weathering, and before I applied the matte coat, these things looked a bit more like a hot mess.  All the different washes and the technical paint had left various levels of gloss across the models.  By applying a quick matte coat, all that was gone and the effects were blended together.  Should you want some weathering to be glossy (like oil drips and such) it might be best to either apply those after your sealing coat, or apply just a bit of gloss coat in those areas after the matte coat has been applied and dried.

     Just the base left to go.  Here is a little preview:


Friday, March 7, 2014

Ready for take off!


Ork Bommer Almost Complete

     The Ork Bommer, which has been languishing about for years now, is nearing completion.  I have been using this model as a test bed for some weathering techniques I had read about.  Essentially the plane itself is all finished up.  I have the two over-sized bombs to paint up, and a fancy resin base from Secret Weapons Miniatures to do.  I need to go pick up some appropriate flock for the base, and figure out what colors I'm going to use there.  The bombs actually present a bigger challenge in the style department.  I could see doing them up in a really rusty dilapidated manner, or painted and decorated in a lovingly Orky style.  I thought about painting one up as Bullet Bill from the old Super Mario games, but I fear that's a little obvious and it's crossing the streams a bit.


Weathering Techniques I Tried

     One of the biggest experiments on this model was using oil paints.  I have long read about them, heard many a story about how it can add another dimension to your painting.  I was a bit intimidated about using something that wasn't water based, and took so long to dry.  After reading through Forge World's Model Masterclass book, I finally felt as though I was armed with enough information to proceed.

     For the first technique, I used the oil paint to shade panel lines and add a look of rust here and there.  Essentially I started small here.  I didn't use the one oil paint I choose in huge quantities.  First I selected Burnt Umber as the color, thinned it with mineral spirits and began using it to shade some of the metallic paints, and panel lines.  The first thing I noticed was how translucent the paint was.  This meant that, applying it as thin as I was, I could control the effect by adding layers after letting each layer dry to build up an effect.  With the paint thinned and the long drying time of the oil paint, this allows you to "push" the paint around quite a lot.  You can easily go back with just a brush loaded with just a bit of the mineral spirits and easily remove the paint if you don't like the look.

     The second technique was using a mixture of the oil paint with a rust weathering powder flicked on to the model using a brush and a toothpick.  The second step was to airbrush mineral spirits over the spots to soften them, then use a brush to streak the spots.  I'm not absolutely certain that I did this properly.  I didn't see the spots softening quite as much as I expected.  The streaking worked like a charm, so I'll certainly use that in the future.

Here are some more shots...


Wednesday, February 26, 2014

Painting Checkers Tutorial


Painting Checkers

I just wanted to go through my process for painting the checker pattern for my Orks.  There might be some other Ork players out there that haven't given this a go.  It's dead simple and it can really set off a model.  Here we go then.

1.  Base the area that you want checks in a very light grey.  Don't go full white as it looks a bit too bright and white typically covers poorly.  If you want full-on white, you still want to build up from a light grey.  If you have an airbrush, use it here after masking off the area you want using the proper low-tack tape. If not, then just use thin layers to build up coverage such that it stays relatively smooth.

2.  Using a pencil, very lightly sketch out a grid pattern on the light grey/white area.  This doesn't need to be laser precise as this will just be a guide for you.  If you can use panels lines like I have in the following picture to help guide your grid, it makes things much easier.

 3. Using straight black or black mixed with dark grey (50/50) you can start to fill in the squares.  I usually start by painting the outline of the square, then fill in.  Paint consistency is very important here.  Thin is good, but if you go too thin, you lose control of your paint.  I would recommend practicing a small square before applying the dark color to the model.

4. Clean-up the checks by using either the light grey or the black to even out the boxes.  Don't become too concerned about perfection here.  Just get them such that at arms length they look acceptable.  The more time you spend in this last step, the better they can look, but remember to take a break and look at the model at normal viewing range from time to time.  Often times we focus on the details of things that disappear completely when you pull your head back from the model.


5. (Optional) Use a sepia wash to dirty up the checks, dulling the white.  This helps tie the pattern back into the model.  Weathering the checks is another great option.  You can use a medium grey shade to show chipped paint or even just the base coat of the rest of the model.  Apply these colors using a bit of sponge to achieve an irregular pattern.

That's it.  Nothing fancy but this looks great on the table.  If you have an airbrush you can also mask off the white squares and spray black over the strip.  This gives a very precise look, but not everyone has access to an airbrush so I wanted to go through the steps assuming you didn't.  If you have any questions, just post below.

Tuesday, February 25, 2014

Ork Blitza Bommer


The Ork Blitza Bommer

     I've had this model rattling around in a box for quite some time.  It occurred to me that it would provide a perfect test bed for some weathering techniques I'd like to try.  The Forge World Modeling Masterclass Vol. 1 has a ton of great techniques and I've purchased some supplies to give them a go.  The picture above shows the model pre-weathering, so I'll update when I've completed the next step.  The pilot and the tail gunner were finished some time ago.  Here are some close-ups of those:

 Pilot sporting a fine leather flight helmet

Grot tail gunner with a big "flash" gun sight

Thoughts on the Model

     The Ork flyer was a bit of a shocker when it was released some years ago.  The shock was not that they released a new kit for my beloved Orks, but that the kit looked better than the Ork flyers that were already on offer from Forge World.  Exhibit A:

Fact: Not as cool!

     The Ork flyer kit that GW released contains a good amount of options.  Enough that you could make at least three variations of each of the three unit types.  I choose the Blitza Bommer not because it seems the best, but because it has a wacky "roll to see what crazy thing happens" table for bombing targets.  I also liked the over-sized bombs it gets to carry.  I'll be saving those to paint last.